Welcome to Doom9's Forum, THE in-place to be for everyone interested in DVD conversion. Before you start posting please read the forum rules. By posting to this forum you agree to abide by the rules. |
 16th November 2011, 03:24
|
#1 | Link |
|
Huh?

Join Date: Sep 2003
Location: Uruguay
Posts: 3,103
|
Trying to restore a photograph, need advice.
A few days ago, I took some pictures at a friend's wedding. One in particular came out allright(ish), but a bit too dark. Not knowing Photoshop and not caring to learn for the exceptionally few times I'd need it, I turned to my staple: Paint.Net's Autolevels and some Avisynth PP.
Now, the chroma issues after the levels adjustment are so bad that no matter how high I set the sigma on FFT3DFilter's chroma planes mode, they are barely affected at all. And and I've never found a luminance denoiser that worked as well as Noise Ninja's (not even TNLMeans). So, I had to rely on NN alone. However, not all chroma noise can be eliminated with just that, and there are black spots (byproduct of the levels adjustment) that are very difficult to remove. Here is a section of the original photo, and the same section after automatic levels adjustment:   Do you guys think there might be a way of eliminating or at least reducing the black spots and to soften the chroma a bit so that Noise Ninja can completely remove the remainder?
__________________
Read Decomb's readmes and tutorials, the IVTC tutorial and the capture guide in order to learn about combing and how to deal with it. Last edited by Chainmax; 16th November 2011 at 03:27. |

|

|
|
16th November 2011, 06:53
|
#2 | Link |
|
Registered User
Join Date: Feb 2002
Location: California
Posts: 2,695
|
It's always best to use the right tool for the job. AVISynth and its plugins are great for a lot of things, but I'd sure recommend finding a photo editing tool and using that. I use an old program called PhotoImpact, and it has tools that will eliminate much of the "grain" and also that green mottling.
Also, the same company that makes the Neat Video noise reduction also has a program called Neat Image. You could download that and try it out. There are also several other programs designed specifically for gaining dark photos and removing the noise -- that is all they do. I have not used them, but Magenomic's "Noiseware" and PictureCode's "Noise Ninja" are typical of these programs. Last edited by johnmeyer; 16th November 2011 at 06:53. Reason: Typo I missed using "quick reply" |
|
|
|
|
16th November 2011, 06:56
|
#3 | Link |
|
Registered User
Join Date: Feb 2002
Location: California
Posts: 2,695
|
P.S. I was just about to close down the Google search I used to find those two programs when I saw a noise reduction software comparison page that I remember reading many years ago. I still think it is useful information:
Noise Reduction Tool Comparison |
|
|
|
|
16th November 2011, 10:14
|
#4 | Link |
|
Registered User
Join Date: Apr 2002
Location: Germany
Posts: 5,391
|
Geographically, the greenish blotches are inhabitants of the Blue district in RGB mainland. Politically, they are the chairmans of the H and S groups of the HSV party.
The junk bonds of Blackspot Inc. could be liquidated with a moderate haircut on dark luminance debts.
__________________
- We´re at the beginning of the end of mankind´s childhood - My little flickr gallery. (Yes indeed, I do have hobbies other than digital video!) |
|
|
|
|
16th November 2011, 10:33
|
#5 | Link |
|
Registered User

Join Date: Mar 2009
Location: Germany
Posts: 5,769
|
Generally, underexposed photos are hard to be corrected, because they lack the dynamic. Of course, it also depends on what one are used to consider quality.
__________________
Born in the USB (not USA) |
|
|
|
|
17th November 2011, 01:30
|
#6 | Link |
|
Huh?
Join Date: Sep 2003
Location: Uruguay
Posts: 3,103
|
johnmeyer: thanks for the suggestion, particularly the standalone denoisers comparison. However, I must point out that I am already using Noise Ninja, and what I need is something to complement it.
Didée:, so, blurring of the blue channel then? How would that be done? I only know how to blur all chroma channels at once. As for the rest...erm...I didn't get it.  Ghitulescu: I know, but anything will be an improvement here, I daresay. I just remembered that TemporalSoften was pretty good for extreme cases, maybe I'll give it a whirl too.
__________________
Read Decomb's readmes and tutorials, the IVTC tutorial and the capture guide in order to learn about combing and how to deal with it. |
|
|
|
|
17th November 2011, 04:08
|
#7 | Link |
|
Registered User
Join Date: Feb 2002
Location: California
Posts: 2,695
|
Sorry I missed that you were using Noise Ninja. I need to read more carefully.
I just tried doing restoration on the original, and I actually wonder whether at least part of the problem is that you are trying to apply too much gain to the dark suit. I don't think there is any useful information there. I was able to end up with a reasonably nice looking result by applying a non-linear gain ("color curve") to the original, thus retaining lots of detail in the highlights; gaining the flesh on the neck, but leaving the suit dark. In looking at your brightened version above, it doesn't show any meaningful detail on the suit, unless the guy had a lot of black mold spots on the suit. Thus, if you don't apply gain to the shadows, you won't need to deal with green blotches and black spots. |
|
|
|
|
18th November 2011, 20:09
|
#8 | Link |
|
契約者

Join Date: Jun 2008
Posts: 1,576
|
Uh, ah... is there anything in this photo that can be restored? Then... then i think photoshop is the only option... or better illustrator, but currently I don't have 2nd installed. Here is my try... I believe the noise is gone! And I recovered some of the details that was there, and maybe even some that wasn't there! (*^_ ^*)
|
|
|
|
|
18th November 2011, 20:32
|
#9 | Link |
|
Registered User

Join Date: Jan 2010
Posts: 709
|
try to bright less, to retain noise impercettible in dark parts, and to compensate with contrast, photoshop with auto tone and auto contrast works well, also noise/grain reduction should be done first.
__________________
powered by Google Translator |
|
|
|
|
20th November 2011, 00:04
|
#10 | Link |
|
Registered User
Join Date: Apr 2006
Posts: 299
|
I think TNLMeans can do stuff Noiseninja can't do on coarse chroma blotches, don't be shy with the radius parameters. These are diffucult examples though, getting rid of the blotches also gets rid of micro chroma detail and makes faces look pale and what not. Maybe someone could come up with a badass masking-contrasaturation script? I'd make liberal use of addgrainC just to get a more consistent quality throughout the image. BTW I'd tweak individual RGB channels manually rather than use auto-anything, in your example the blue and green channel levels need to be turned down.
|
|
|
|
|
20th November 2011, 04:43
|
#11 | Link | |
|
Registered User
Join Date: Nov 2009
Posts: 2,361
|
Quote:
As for the image my recommendation when I spot these color stains is to use dfttest agressively spatially in the U channel or where yellow resides if using RGB. |
|
|
|
|
|
23rd November 2011, 20:28
|
#12 | Link | |||||
|
Huh?
Join Date: Sep 2003
Location: Uruguay
Posts: 3,103
|
Quote:
Quote:
Quote:
Quote:
 is what you are talking about. If so, would you suggest me to do it before or after? Also, how would you advice me to start experimenting on it in this picture, as I do not know how? Quote:
__________________
Read Decomb's readmes and tutorials, the IVTC tutorial and the capture guide in order to learn about combing and how to deal with it. Last edited by Chainmax; 23rd November 2011 at 20:30. |
|||||
|
|
|
|
23rd November 2011, 22:33
|
#13 | Link |
|
Registered User
Join Date: Nov 2009
Posts: 2,361
|
for me the blotches are more like yellow, I would have used dfttest(tbsize=1,sigma=50,false,true,false,dither=1), anyways I just tried and didn't do much.
Instead tried this: mt_lut("x 130 < 130 x ?",y=2,v=2,u=3) 
Last edited by Dogway; 23rd November 2011 at 22:42. |
|
|
|
|
24th November 2011, 02:12
|
#14 | Link | |
|
Registered User
Join Date: Feb 2002
Location: California
Posts: 2,695
|
Quote:
I then used the "magic wand" to select the dark vest. I then desaturated this, since there is no color in the vest. This quite effectively removed the green blotches. I then merged this back into the photo. Finally, just to make sure that other chroma noise was eliminated, I applied a chroma noise filter. If I hadn't been able to do the quick magic want selection, and if I had to deal with that green chroma noise throughout the picture, this chroma noise filter would have gotten rid of about half of it. Also, keeping the vest darker -- which I personally believe provides a more natural representation -- keeps the green from showing up as much. Lots of ways to skin the same cat. Here's the result of my one minute "restoration:" 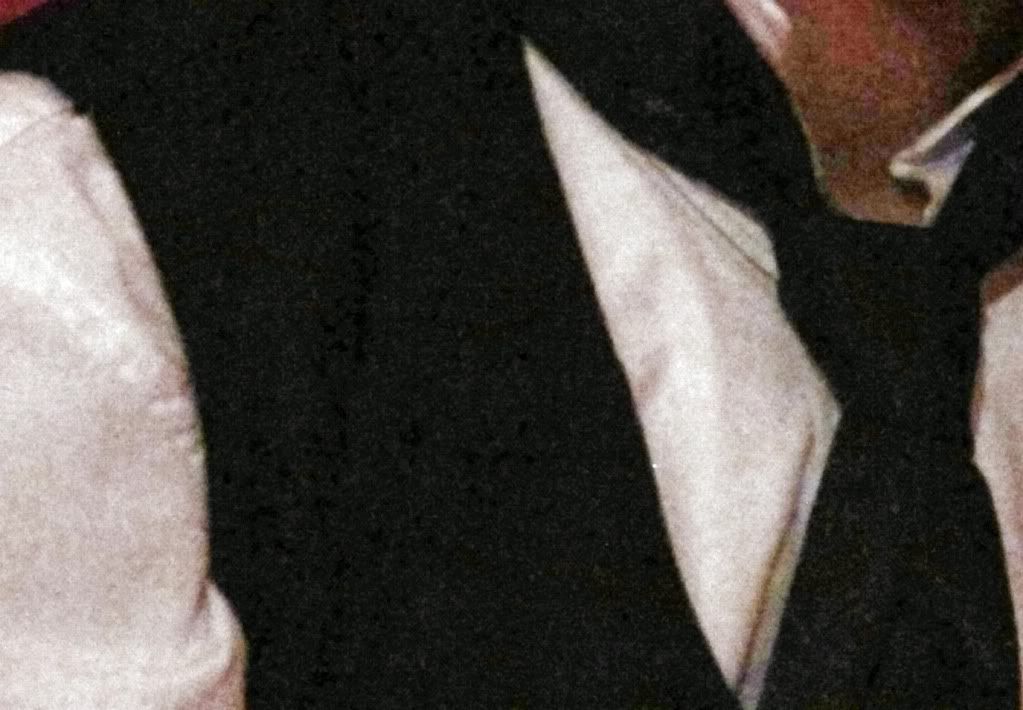 If I had the entire frame to deal with, I might perhaps have gained the highlights a little bit more, although my personal tastes tend to abhor highlights that are blown out, so I generally try to keep the bright parts of white shirts darker than most people might like. I also might have done a little spatial noise reduction. If you want to do all this in AVISynth (since this is an AVISynth forum), you might have some luck with the CNR2 chroma reduction plugin for VirtualDub which I use all the time in AVISynth. Use that after using an auto-gainer, like the HDRAGC plugin. Last edited by johnmeyer; 24th November 2011 at 02:13. Reason: Corrected typo I missed when previewing the post |
|
|
|
|
|
24th November 2011, 04:01
|
#15 | Link | |
|
Registered User
Join Date: Apr 2006
Posts: 299
|
Quote:
 Don't do auto anything or you'll risk washing out bright parts and crushing dark parts once all the adjustments are done and at that point you'll just have to start over. Unless you have a calibrated monitor cross-check your result on a second monitor or tv. Of course there's more but the operations I described will have you covered in 95% of the time. 
Last edited by markanini; 24th November 2011 at 04:03. |
|
|
|
|
 |
| Thread Tools | Search this Thread |
| Display Modes | |
|
|


 Linear Mode

